As we talk about the automation in VM provisioning , One of the crucial step is to get the IP address from external source.
Recently I was working on used case where we want to provide the IP addresses at the time of submitting the provisioning.
There are multiple ways to do it in VRA and VRO . I am using VRA ABX Python action to achieve it.
Used Case: I want to submit more than one machine at time and provide the IP addresses at same time. For my example I am using 2 Machines here.
Subscription Used:
- Compute Allocation
- Network Configure
First Lets take a look at Blueprint’s Yaml where we define all custom properties.
formatVersion: 1
inputs:
  firstVM:
    type: string
    title: NewVMName1
  SecondVM:
    type: string
    title: NewVMName2
  VM1IP:
    type: string
    title: VM-1-IP
  VM2IP:
    title: VM-2-IP
    type: string
resources:
  vSphere_Machine:
    type: Cloud.Machine
    properties:
      firstVM: '${input.firstVM}'
      SecondVM: '${input.SecondVM}'
      VM1IP: '${input.VM1IP}'
      VM2IP: '${input.VM2IP}'
      abxaction: 'yes'
      count: 2
      image: VMwareCode-CentOS
      flavor: VMwareCode-small
      networks:
        - network: '${resource.vSphere_Network.id}'
          assignment: static
  vSphere_Network:
    type: Cloud.vSphere.Network
    properties:
      networkType: existing
      constraints:
        - tag: 'vsphere:network'
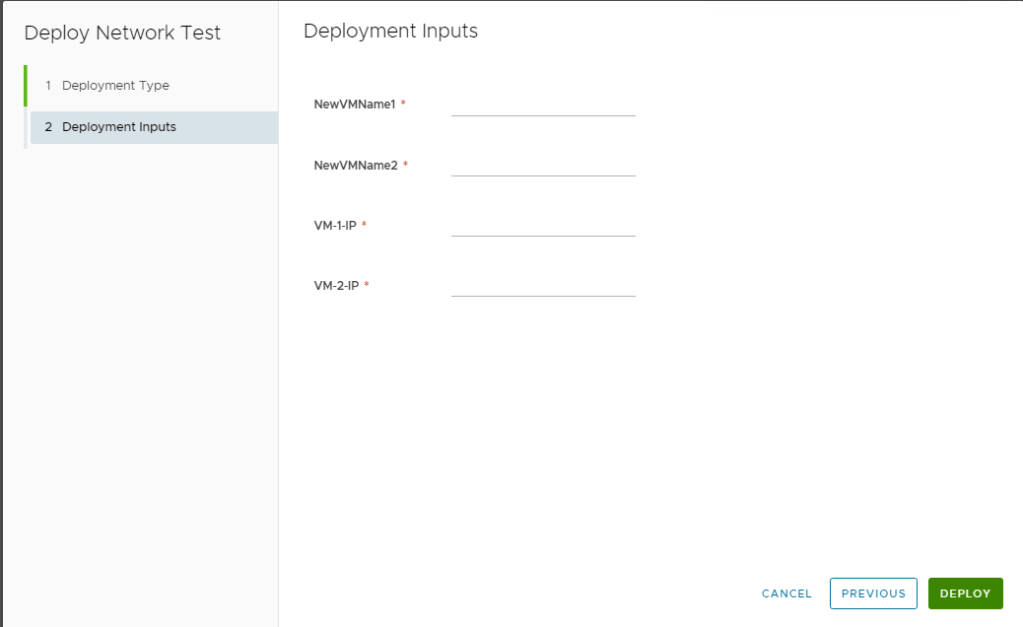
- As we see above , I am using 4 Inputs as 2 VM names and 2 IP addresses in line 19-22
- Line 23 we will use for condition in subscription
- Also I am using static assignment in line 28-29
- Line 35 is to Target the Network Profile where I have defined the Range

Once we are done with Blueprint, that is how it will look like when we click on Deploy
Since I am changing the name of VM and assigning the IP , I would need 2 ABX action
Below is the action is to change the VM Name as per Input

def handler(context, inputs):
    firstVM = inputs['customProperties']['firstVM']
    secondVM = inputs['customProperties']['SecondVM']
    returnobj = inputs
    returnobj['resourceNames'][0] = firstVM
    returnobj['resourceNames'][1] = secondVM
    return returnobj
Here is the action for Assigning the IP addresses to correspond VMs.

def handler(context, inputs):
    firstVMIP = inputs['customProperties']['VM1IP']
    SecondVMIP = inputs['customProperties']['VM2IP']
    outputs = {}
    addresses = [[]]
    outputs["addresses"] = addresses
    outputs["addresses"][0]=[str(firstVMIP)]
    outputs["addresses"].append([SecondVMIP])
    return outputs
If you have followed the article without missing any step, means you are done Python and Yaml code stuff.
Now all is left is Creation of the subscription If already not exist and Map to above created ABX python action.
To create the new Subscription follow below
Click on Cloud Assembly => Click Extensibility => Subscription = > Click New Subscription

Provide Name, enable Subscription and on Event Topic Choose Compute Allocation
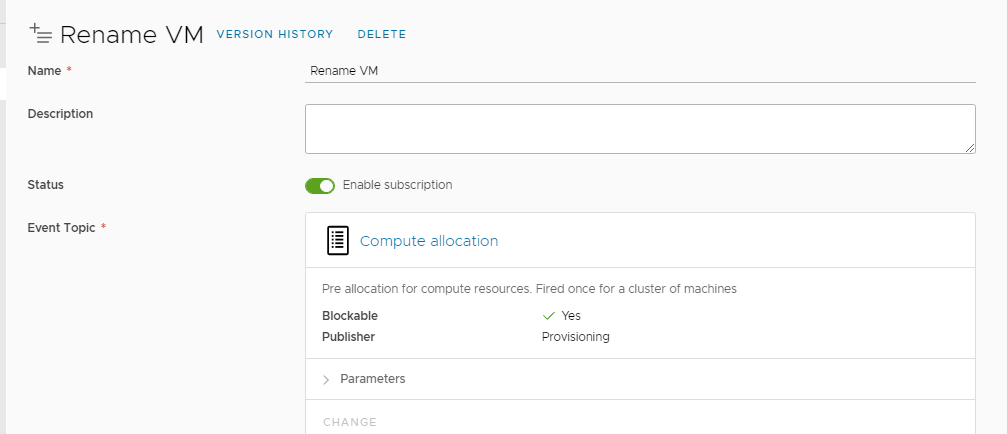
If you noticed in YAML line number 23 I have specified the condition abxaction: yes
abxaction: 'yes'
In subscription we are using that as condition to run and in action/workflow choose abx and above created action.

Click Save and we are done with Rename subscription.
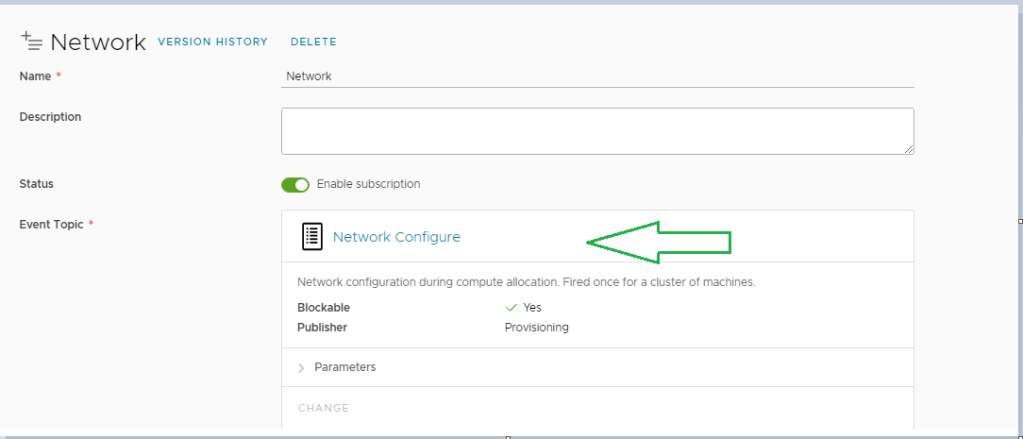
Click New subscription once again and this time we will choose Network Configure subscription and network action , Rest all settings will be same.

so we have done all the coding and configuration , Now it is time to submit the VM provisioning request .


As we see the name as we submitted during provisioning, lets check the IP of each .


Both VMs got renamed and static IP which we entered has been applied to VMs.
Disclaimer: Indexing issue for multi Dimensional array has been fixed in 8.4.1, which was getting interchanged in 8.3 and 8.4

12 responses to “How to use Compute allocation & Network configure subscription to change the IP address and Rename of VM in VRA 8”
[…] article is detailed and will step you through this […]
LikeLike
[…] How to use Compute allocation & Network configure a subscription to change the IP address and re… 8 by Ankush (@ankush11s) India […]
LikeLike
Thanks for sharing this its very helpful but the method for IP allocation has changed in the newer version of VRA 8.x.
We no longer have to append the two or more IP addresses to the list of lists. Each VM creation event is treated separately for a single deployment and there is an input attribute called IndexCount that tracks the VM creations. That can be used has a hint in the code to allocate the different IP addresses.
LikeLike
Thank you so much for sharing.
LikeLike
Hi
I have a problem with code in extensibilty
. This code work correctly with one vm and rename it. But when i add secondvm in code . Error happen. List assignment index out of range.
In file main.py
Would you please help me
LikeLike
Are you adding separate resource in canvas or increasing the count of VM in existing
If you notice I have used count instead of 2nd resource
LikeLike
Dear,
Would be possible to make as a 2nd day action ?
Regards
LikeLike
LikeLike
Did you find a solution to your problem? I am facing the same issue since VRA 8.12 there is ability to reserve the IP addresses of the internal IPAM.
https://developer.vmware.com/docs/18201//GUID-2E4B60B3-B150-4F85-AD93-BE60C51DCDCF.html
However, we’re using an older version of VRA so unable to find a solution as well
LikeLike
Hi,
Yes, I’ve fixed it by adding after line 5:
outputs[“skipIPAllocations”] = [[ False, False ]]
The description is not pretty clear, but does his job.
It works only during deployment, I’m not looking a way for let it work also during an update (meaning to change the IP address after the deployment).
Best Regards
LikeLike
Sorry, in my last post I meant: I’m looking for a way to let it work also during an update
LikeLike