Previously we created the individual function to login into VRA tenant and list all the tenant.
If you have not seen the previous post you can Click here
As we know it can become tedious task If we have to save multiple python functions for different functionality . To avoid that I have come with VraClass which will have all the methods so far i have developed and I will keep on adding into it as i explore more.
Now time to see the code and see how it works.
import requests
import json
from prettytable import PrettyTable
from requests.packages.urllib3.exceptions import InsecureRequestWarning
requests.packages.urllib3.disable_warnings(InsecureRequestWarning)
class vraclass:
def __init__(self, vraurl, username, password, tenant):
self.username = username
self.password = password
self.vraurl = vraurl
self.tenant = tenant
def vralogin(self):
url = f"https://{self.vraurl}/identity/api/tokens"
payload = f'{{"username":"{self.username}","password":"{self.password}","tenant":"{self.tenant}"}}'
headers = {
'accept': "application/json",
'content-type': "application/json",
}
response = requests.request("POST", url, data=payload, headers=headers, verify=False)
outp = response.json()['id']
token = "Bearer " + outp
return token
def list_tenant(self):
mainurl = f"https://{self.vraurl}/identity/api/tenants"
vraheaders = {
'accept': "application/json",
"authorization": self.vralogin()
}
output = requests.request("GET", mainurl, headers=vraheaders, verify=False)
result = output.json()['content']
resulTable = PrettyTable(['Type', 'ID', 'URLName', 'Name', 'Description', 'ContactEmail', 'DefaultTenant'])
for i in result:
resulTable.add_row(
(i['@type'], i['id'], i['urlName'], i['name'], i['description'], i['contactEmail'], i['defaultTenant']))
print(resulTable)
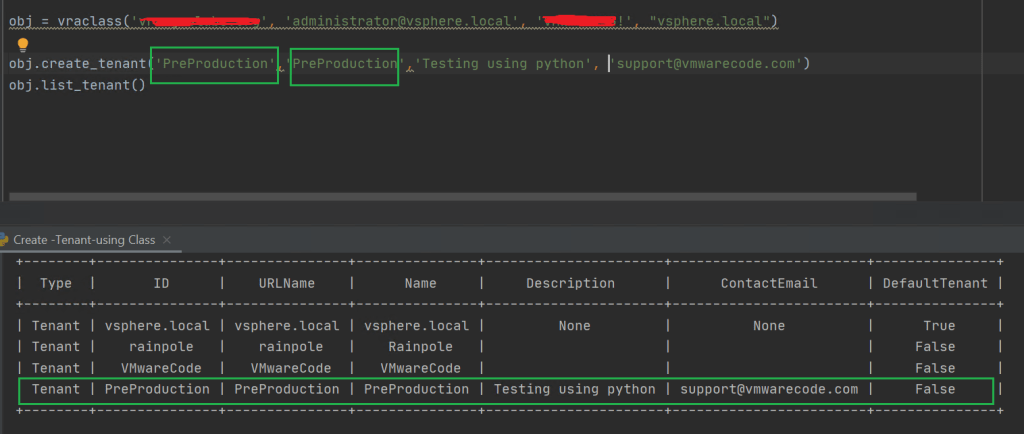
def create_tenant(self, tenantname, urlName, Description, ContactEmail):
url = f"https://{self.vraurl}/identity/api/tenants/{urlName}"
payload = f'{{"@type":"Tenant","id":"{tenantname}","urlName":"{urlName}","name":"{tenantname}","description":"{Description}","contactEmail":"{ContactEmail}","defaultTenant":"false"}}'
headers = {
'accept': "application/json",
'content-type': "application/json",
"authorization": self.vralogin()
}
output = requests.request("PUT", url, data=payload, headers=headers, verify=False)
How to use the above code
1. Copy paste the code in your Python editor and make sure it has access to VRA URL.
2. Use the below command to Instantiating classes in Python or In simple words call the class for the first time.
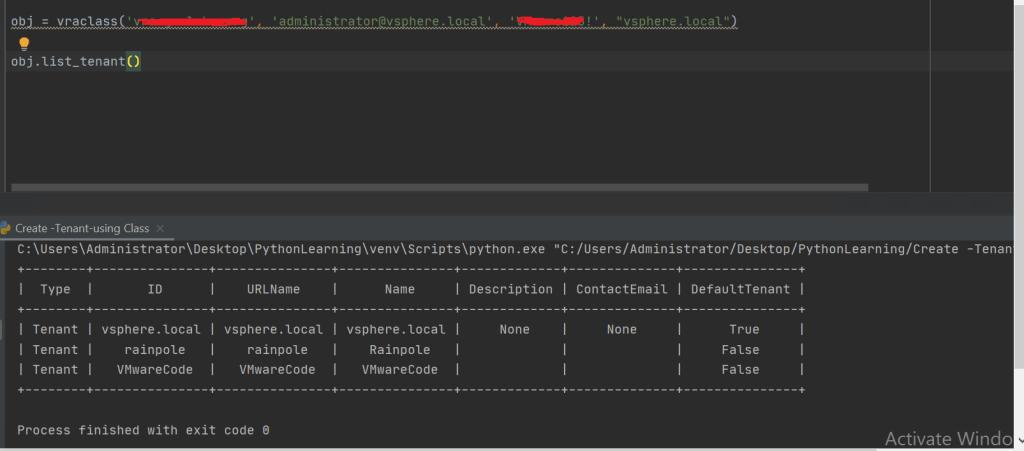
obj= vraclass('vrafqdn', 'administrator@vsphere.local', 'Vrapassword', "vsphere.local")
Above we are creating the object to call the class , And to call the class it is mandate to provide VRAurl, username,password,tenantName.

Now we have initialize the class .We can use the define method dynamically .
Currently It has only 3 methods vralogin , list_tenant , create_tenant.
But I will keep adding those as i explore more !
We can call any method at anytime. No need to call the login method every time.
in Authorization it is calling the login method by default.
Sample to call the method.
Here I am calling the list method to check how many tenants we have.
Now I am calling create_tenant method and will pass the mandate parameters for creating it.