In this blog we will go through , How can we utilise the Aria Automation (VRA) Cloud Template and Service broker to deploy the Extensibility Proxy or Saas version of vRO.
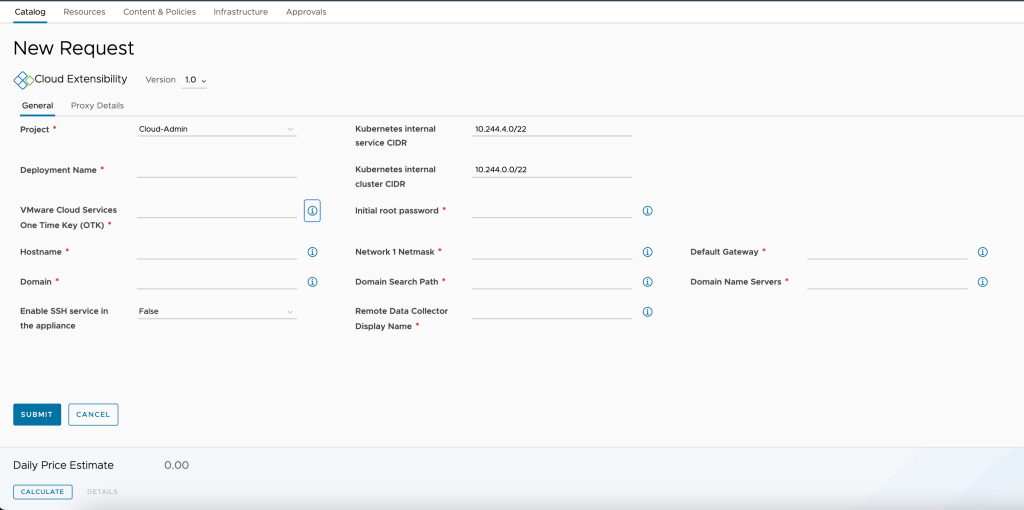
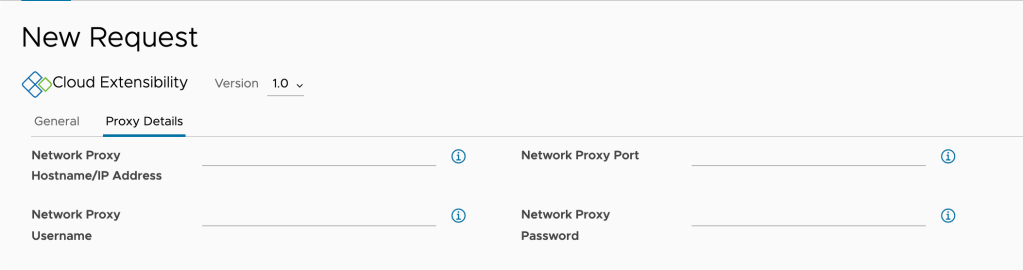
Here is how self Service catalog of extensibility proxy will look like.

Before we get started there are some prerequisites which we need to complete before we start provisioning the extensibility proxy.
Prerequisites:
- Make sure we have deployed cloud proxy and Created the Cloud accounts , Cloud Zones and Network profile.
- Makes sure we check if we have an available IP address in network profile in VRA Cloud
- Make sure we have created forward and reserve DNS record using the IP address of step 1 .
- Make sure you have whitelisted below urls.
3.1. ci-data-collector.s3.amazonaws.com
3.2. symphony-docker-external.jfrog.io
3.3. data.mgmt.cloud.vmware.com
3.4. api.mgmt.cloud.vmware.com
3.5. console.cloud.vmware.com
3.3 , 3.4 and 3.5 –These is for default US Region , if you are in some other Region then we need to add prefix with Region code.
Example:
UK — uk.data.mgmt.cloud.vmware.com uk.api.mgmt.cloud.vmware.com uk.console.cloud.vmware.com
Below are the region code available.
India –in
Uk — uk
Australia–au
Singapore–sg
Brazil–br
Germany–de
Canada–ca
Japan–jp
Once we complete all the prerequisites , we will create the Cloud template using below Yaml code.
formatVersion: 1
inputs:
  hostname:
    type: string
    title: Hostname
    description: Enter FQDN of the appliance
  DisplayName:
    type: string
    title: Remote Data Collector Display Name
    description: Name will be displayed in VRA Cloud
  varoot-password:
    type: string
    title: Initial root password
    encrypted: true
    description: Provide Root Password
  domain:
    type: string
    title: Domain
    description: Enter Domain name
  domainseatch:
    type: string
    title: Domain Search Path
    description: Provide Domain search path
  dnsservers:
    type: string
    title: Domain Name Servers
    description: Enter DSN server , Use coma seprated if more than one
  Netmask:
    type: string
    title: Network 1 Netmask
    description: Enter subnet mask
  gateway:
    type: string
    title: Default Gateway
    description: Provide gateway IP address
  otk:
    type: string
    title: VMware Cloud Services One Time Key (OTK)
    description: 'Enter Unique OTK key <br>Path to Retrieve: <br> Infrastructure => Integreation => Add Integreation => Extensibility Action ON-Prem'
  k8s-cluster-cidr:
    type: string
    title: Kubernetes internal cluster CIDR
    description: Kubernetes internal cluster CIDR
    default: 10.244.0.0/22
  k8s-service-cidr:
    type: string
    title: Kubernetes internal service CIDR
    default: 10.244.4.0/22
    description: Kubernetes internal service CIDR
  va-ssh-enabled:
    type: string
    enum:
      - 'True'
      - 'False'
    title: Enable SSH service in the appliance
    default: 'False'
  network_proxy_hostname_or_ip:
    type: string
    title: Network Proxy Hostname/IP Address
    default: ''
    description: Enter Network proxy hostname if any
  network_proxy_port:
    type: string
    title: Network Proxy Port
    description: Provide Port number of proxy if any
    default: ''
  network_proxy_username:
    type: string
    title: Network Proxy Username
    description: Provide proxy username if any
    default: ''
  network_proxy_password:
    type: string
    title: Network Proxy Password
    description: Provide proxy password if any
    default: ''
resources:
  CEXP:
    type: Cloud.vSphere.Machine
    properties:
      imageRef: https://vro-appliance-distrib.s3.amazonaws.com/VMware-Extensibility-Appliance-SAAS.ova
      cpuCount: 8
      totalMemoryMB: 32768
      constraints:
        - tag: vCenter115:vRA_Payload1
      ovfProperties:
        - key: vami.domain.vRealize_Automation_Cloud_Extensibility_Proxy
          value: ${input.domain}
        - key: rdc_name
          value: ${input.DisplayName}
        - key: vami.netmask0.vRealize_Automation_Cloud_Extensibility_Proxy
          value: ${input.Netmask}
        - key: vami.gateway.vRealize_Automation_Cloud_Extensibility_Proxy
          value: ${input.gateway}
        - key: ONE_TIME_KEY
          value: ${input.otk}
        - key: vami.hostname
          value: ${input.hostname}
        - key: vami.ip0.vRealize_Automation_Cloud_Extensibility_Proxy
          value: ${self.networks[0].address}
        - key: k8s-cluster-cidr
          value: ${input.k8s-cluster-cidr}
        - key: varoot-password
          value: ${input.varoot-password}
        - key: k8s-service-cidr
          value: ${input.k8s-service-cidr}
        - key: vami.searchpath.vRealize_Automation_Cloud_Extensibility_Proxy
          value: ${input.domainseatch}
        - key: vami.DNS.vRealize_Automation_Cloud_Extensibility_Proxy
          value: ${input.dnsservers}
        - key: va-ssh-enabled
          value: ${input.va-ssh-enabled}
        - key: network_proxy_hostname_or_ip
          value: ${input.network_proxy_hostname_or_ip}
        - key: network_proxy_port
          value: ${input.network_proxy_port}
        - key: network_proxy_username
          value: ${input.network_proxy_username}
        - key: network_proxy_password
          value: ${input.network_proxy_password}
      networks:
        - network: ${resource.Cloud_vSphere_Network_1.id}
          assignment: static
  Cloud_vSphere_Network_1:
    type: Cloud.vSphere.Network
    properties:
      networkType: existing
      constraints:
        - tag: vCenter115:network
As my vCenter has access to public site I am using imageref on Line 81 , but you can use image profile and select the location where you have uploaded the ova.
Line 85 and 129 is to target the specific cluster and network profile in VRA Cloud. this may be differ as per your environment .
Now we will release the Cloud template version and Enable the custom form for this Cloud template.
Attaching the custom form json .
Last step is to import the custom form using below.

If we have followed the blog till now , your Self Service Catalog is ready which can deploy Cloud Extensibility proxy.
